
DR Dabber
Dr Dabber Switch: Induction Cup with Sapphire Insert
- SKU:
- E-DRDBR-SWCH-SPH-CP
- Condition:
- New
- Minimum Purchase:
- 1 unit


Description
Dr Dabber Switch Sapphire Induction Cup
The Dr Dabber Switch Sapphire Induction Cup comes with two necessary components, a titanium bucket to facilitate the induction heating method that is featured on the Dr Dabber Switch and a Sapphire Insert. Sapphire is not commonly seen on electric dab rigs and when we saw Dr Dabber take a switch *no pun intended* in this direction, we were obviously excited.
Sapphire is the creme de la creme when it comes to dabbing surfaces, most users say that the experience in regards to flavor is super similar to Silicon Carbide. We suggest going with sapphire if you're a fan of lower temperature dabs because it equires a little more upkeep when used at higher temps. Heating this material upwards of 600 degrees may cause a burnt-on residue after coming into contact with concentrates. As mentioned previously both Sic and Sapphire accentuate flavor, sapphire is said to pronounce each individual note more producing a crispier flavor, whereas Silicon Carbide produces a more robust flavor which packs a punch.
What are you waiting for! Taste terpenes like never before with the Dr. Dabber Switch Sapphire Induction Cup!
Note: The Switch must be in Crystal Mode to use the Switch Sapphire Induction Cup.
Specifications:
- Materials: Sapphire and Titanium
- Used for Lower Temp Dabs
- Compatible with Dr Dabber Switch
Features:
- Purest Possible Dabbing Surface Producing Unimaginable Flavors
- Luxury High Quality Gemstone Insert
- Upgraded Insert For Dr Dabber Switch
Includes:
- 1 x Sapphire Insert
- 1 x Titanium Cup
Quick Tip
High temp Vs Low Temp – Just because you can take these devices upwards of 900 degrees doesn't mean you would want to nor is it advised. Many dabbers have a "sweet spot", referring to the temperature at which the flavor, potency and vapor quality are all completely in line with the user’s preferences. Each dabber’s sweet spot is unique based on what it is that they want out of their dabbing experience. Using a torch to heat your nail means that finding your sweet spot can be a hit or miss, as it's hard to memorize exactly how you applied the torch to get that quality experience. With an enail, you can keep the setting that you like so that you always find that sweet spot with each pull of vapor that you take.
To Read More about High Temp Vs Low Temp Dabbing Click Here!
What is Induction Heating?
Induction heating, when it comes to dabbing, is the process of heating wax or dry materials inside of an induction cup through electric current. The electric current disrupts the flow of current within the conductive metal, creating a resistance. This resistance then creates heat. As the induction cup heats up, it vaporizes the contents within the cup.
There is no flame present with this heating method, no wire heating element, no coils to replace. Induction Heating allows the user to adjust temperatures through voltage, current, and frequency, it is the most fine-tuned, precise, method available in electric dab devices on the market. With this process of indirect heat, there is no chance of burning through materials instead of vaporizing them, which ultimately leads to waste.
How Do I Power On My Dr Dabber Switch?
- Flip the Power Switch to either the (LEAF)mode for vaporizing leaf-based products, or the (OIL) mode for essential oils.
- When changing modes on the SWITCH, the Power Switch must be turned to the "OFF" position before turning to the opposite mode.
- The unit is turned off by returning the Power Switch to the center position. The LEDs will light up Cyan, then fade to Black.
- Internal persistent memory allows the SWITCH to be turned back on and retain the most recent Power Settings within that Mode.
How Do I Adjust the Power Settings on My Dr Dabber Switch?
- Press the (+) or (-) button to display the current Power Setting.
- Press (+) or (-) button again within 5 seconds to increase or decrease the Power Setting.
- To save settings immediately press the (Go) button. If button is not pressed within 5 seconds, setting will automatically be saved.
- After the Power Setting is saved, the front LEDs will illuminate Pink to display the units battery level. Each LED represents 20% charge ( eg: 5 LEDs represents a full charge, 1 LED represents 20% battery life) Pink flashing lights indicate the battery contains less than 10% charge. Under this condition, The SWITCH must be charged before next use.
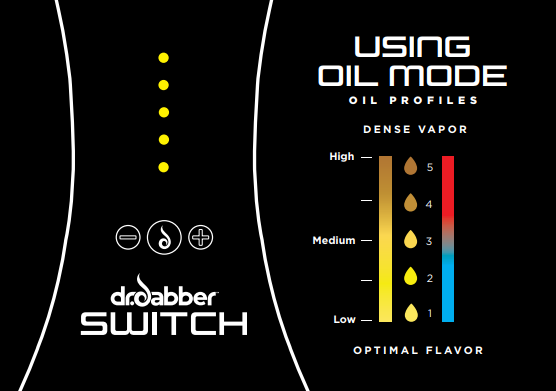
How Do I Use "Oil Mode" On My Dr Dabber Switch?
- Fill the Glass Percolator Attachment while removed from the unit with a few ounces of water (test the attachment before putting it back on the unit to ensure water does not splash into the mouthpiece).
- Secure the Glass Percolator Attachment onto the SWITCH glass top.
- Be sure the Power Switch is on the oil setting (OIL).
- Set to the desired Power Setting by using the (+) or (-) buttons. 1 YELLOW LED is calibrated for maximum flavor profile and 5 YELLOW LEDs is calibrated for optimal vapor density.
- Place the Ceramic Induction Cup into the glass top. It is also possible to pre-load the Ceramic Induction Cup prior to placing in the glass top.
- Prepare your product on the loading tool.
- Press the (Go) Button.
- The SWITCH LEDs will escalate Red when heating then turn Green when the unit has reached temperature. Once the lights turn green, you may use the device.In standard mode the device will hold the heat profile for 15 seconds which is then followed by a cooldown mode indicated by cascading Blue LEDs.
- Press the (Go) button at any time to cancel the heating cycle.
- When the unit returns to standby mode, it is ready for the next heating cycle.
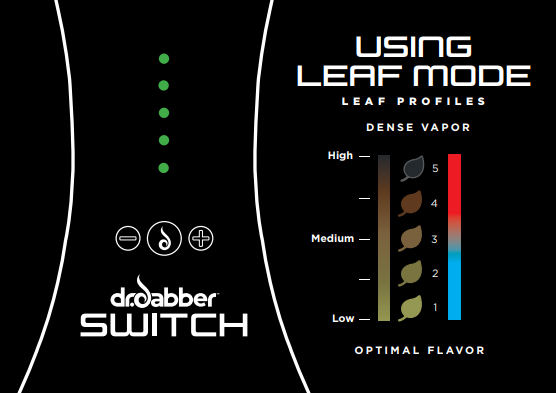
How Do I Use "Leaf Mode" On My Dr Dabber Switch?
- Fill the Glass Percolator Attachment while removed from the unit with a few ounces of water (test the attachment before putting it back on the unit to ensure water does not splash into the mouthpiece).
- Secure the Glass Percolator Attachment onto the SWITCH glass top.
- Be sure the power switch is on the leaf setting (LEAF).
- Set to the desired power setting by using the (+) or (-) buttons.
- 1 GREEN LED is calibrated for maximum flavor profile and 5 GREEN LEDs is calibrated for optimal vapor density.
- Fully pack and compress the Ceramic Induction Cup with your leaf material. The Ceramic Induction Cup can hold approximately 0.35 grams.
- Place the Ceramic Induction Cup into the glass top and cover with the Ceramic Leaf Filter. (prongs facing up)
- Press the (Go) Button, and place the carb cap atop the Glass Percolator Attachment.
- The SWITCH LEDs will escalate Red when heating then turn Green when the unit has reached temperature. Once the lights turn green, you may use the device.In standard mode the device will hold the heat profile for 15 seconds which is then followed by a cooldown mode indicated by cascading Blue LEDs.
- Press the (Go) button at any time to cancel the heating cycle.
- When the unit returns to the standby mode it is ready for the next heating cycle.
Why Is My Dr Dabber Going Into an Auto Cool Down Cycle?
The SWITCH may go in to a cooling cycle if the base unit becomes too warm to operate. The automatic cool down cycle length is determined by the internal temperature of the unit. The warmer the unit, the longer the cool down. This feature prevents the unit from ever overheating and causing damage to the advanced electronics.
- The cool down cycle is indicated by the front LEDs illuminating Blue in a cascading pattern.
- Minimum cool down cycle is 5 seconds.
- Maximum cool down cycle time is 4 minutes.
- If cool down cycle is interrupted by powering the Switch Down, then cool down cycle will reset upon powering the Switch back on.
What are The Differences Between The Inductions Cups on The Dr Dabber Switch?
Although interchangeable, the White Ceramic Induction Cup was designed for use with essential oils, while the Black Ceramic Induction Cup is designed for leaf. The SWITCH is able to detect whether or not an Induction Cup is present and will not begin a heating cycle without a Ceramic Induction Cup in place.
- Ceramic Induction Cups should only be removed after they have cooled to a safe temperature.
- Ceramic Induction Cups should only be removed with the reverse action tweezers.
- Trying to operate the SWITCH with anything other than authentic Dr. Dabber SWITCH Induction Cups may damage the unit and/or cause bodily harm and will void all warranty.
What is "Stealth Mode" On the Dr Dabber Switch?
Stealth Mode is incorporated into the Standby Lighting settings. In Stealth Mode, the SWITCH glass top will not illuminate, and will only indicate functions with the LEDs on the front of the device.
- To change into Stealth mode, press and hold the (-) button.
- While holding down the (-) button, cycle through the lighting options by pressing the (Go) or (+) buttons until only the bottom LED is illuminated.
- Release the (-) button to confirm Stealth Mode.
- To get out of Stealth Mode, simply repeat the above process and choose a different Lighting option.
What Is The "Self Cleaning Cycle" on The Dr Dabber Switch?
The SWITCH is capable of cleaning your Ceramic Induction Cup by running a high energy heat cycle that burns away any remaining residue in the Ceramic Induction Cup.
- From any mode press and release the (+) button. (Will not work in Crystal mode)
- Press and hold the (+) button until the Power Setting reaches maximum, continue to hold for 5 seconds.
- Release the (+) button once the front LEDs begin to escalate in Red. This indicates the high energy heat cycle has begun.
- The front LEDs will display the Power Setting increase, but will revert to the previously selected power setting upon completion of the self cleaning cycle.
- Press the (Go) button at any time to cancel the self cleaning cycle.
How Do I Clean My Dr Dabber Switch?
- Be sure the SWITCH is powered off and that the Ceramic Induction Cups, glass top and Glass Percolator Attachment are cool to the touch before cleaning.
- The SWITCH unit, Induction Cups, Ceramic Filter, Glass Top, and Glass Percolator
- Attachment can be cleaned with isopropyl alcohol and cotton swabs/wipes. Be sure all parts have dried completely before using the device again.
- The Dr. Dabber Crystal Induction Cup (sold separately) can be cleaned with isopropyl alcohol and a cotton swab.
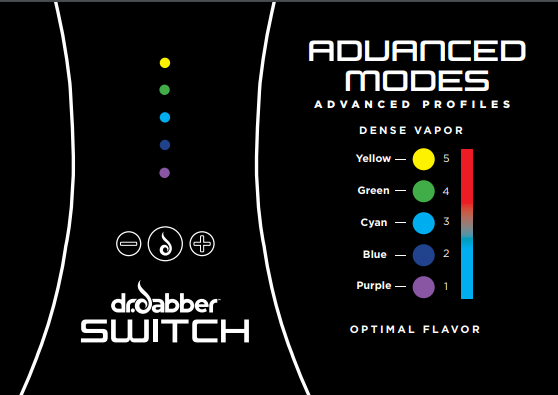
How Do I Use "Advanced Mode" on My Dr Dabber Switch?
Advanced Mode offers 25 Power Settings for the advanced user. This mode is included for those who want even more flexibility in tuning in their ideal setting.
- To enter Advanced Mode, start with the power switch in the "OFF" position.
- Hold the (Go) button and power on the SWITCH by flipping to either (LEAF)or (OIL) . Release the (Go) button.
- The front LEDs will illuminate in a Rainbow indicating the device is now in Advanced Mode.
- Press the (+) or (-) button to display the current Power Setting.
- Press or hold the (+) or (-) buttons again to increase or decrease the Power Setting.
- 1 Purple LED is the lowest Power Setting (profile equivalent to 300 degree range).
- 1 Orange LED is the highest Power Setting (profile equivalent to 800 degree range).
- Wait 5 seconds for the Power Setting to save, or immediately save the Power Setting by pressing the (Go) button.
- After the Power Setting is saved, the front LEDs will illuminate Pink to display the units battery level.
- Higher heat profiles may result in reduced battery life.
How To Train Your Hold Time on the Dr Dabber Switch
The SWITCH allows you to choose your hold time (duration of which the unit holds the desired heating profile) in Advanced Mode. Minimum recordable hold time is 5 seconds, longest recordable hold time is 30 seconds.
- Instead of pressing the (Go) button to use the device, Press and hold the (Go) button.
- The Red escalating LEDs will illuminate indicating the device is heating up. (continue to hold the (Go) button)
- When the device reaches temperature, the LEDs will animate Yellow indicating the device is recording the new hold time. Continue holding the (Go) button as you use the device to train the hold time.
- When you are satisfied with the length of the hold time, let go of the (Go) button.
- The newly recorded hold time will be automatically saved to the Advanced Mode.
How Do I Use "Crystal Mode" on My Dr Dabber Switch?
Due to the nature of quartz crystal, a significantly different heating profile is required to produce optimal vapor density and flavor. This mode is specifically calibrated for the Dr. Dabber Crystal Induction Cup (sold separately). This mode is not suitable for the standard Ceramic Induction cup.
- To access Crystal Mode, the SWITCH must be powered down from Advanced Mode.
- Hold down the (+) button and power on the device by flipping the power switch to either (LEAF)or (OIL).
- The front LEDs will illuminate White to indicate Crystal Mode.
- Release the (+) button.
- If the front LED display illuminates Rainbow, it indicates the device was already in Crystal Mode and has returned to Advanced Mode. Repeat the above process to get back into Crystal Mode
- Press the (+) or (-) button to display the current Power Setting.
- Press or hold the (+) or (-) buttons again to increase or decrease the Power Setting.
- 1 Purple LED is the lowest Power Setting (profile equivalent to 300 degree range).
- 1 Orange LED is the Highest Power Setting (profile equivalent to 800 degree range).
- Wait 5 seconds for the Power Setting to save, or immediately save the Power Setting by pressing the (Go) button.
- After the Power Setting is saved, the front LEDs will illuminate Pink to display the units battery level.
- To change from Crystal Mode to Standard Mode, press and hold the (Go) button while the device is in an off position, then power on the device by flipping the power switch to either (LEAF)or (OIL). This will restart the device in the standard (LEAF)or (OIL) Mode.
- To change from Crystal Mode to Advanced Mode, press and hold the (+) button while the device is in an off position, then power on the device by flipping the power switch to either (LEAF)or (OIL). This will restart the device in the Advanced Mode.
- The Self Cleaning Cycle is NOT available in Crystal Mode. Please see "Cleaning Your Switch" section for instructions on how to clean your Crystal Induction Cup.
Troubleshooting the Dr Dabber Switch
- RED and BLUE flashing LEDs indicate an internal error has occurred with your device. Upon the SWITCH entering the RED and BLUE flashing sequence, turn the device off by returning the Power SWITCH to the center position and follow the directions below.
- RED and YELLOW flashing LEDs indicate an error occurred with your device. Upon the SWITCH entering the RED and YELLOW flashing sequence, turn the device off by returning the power SWITCH to the center position and follow the directions below.
- Reset the device by rotating and removing the magnetic base plate from the bottom of the SWITCH. Once the base plate is removed, position the retainer clips out of the battery's path to pull out the battery pack. Keep the battery pack removed for 10 seconds.
- After 10 seconds, put the battery back into the device and reposition the retainer clips. Replace the base plate and turn the unit back on. The unit should go back to normal functionality.
If your device is still not working correctly, please send an email to info@e-nail.com, stating the specific problem. Please include a picture or video showing the fault and also include your order number.


