What is a Dab Straw? How to Use it? Best Temp for Dab Straws
A dab straw is a dabbing device that streamlines your dab vapors through a straight tube. It's a different way of dabbing without the use of a dab rig. Think of a drinking straw, now think of how it could possibly be used for dabbing. Yep, you probably guessed it, one side of the “straw” vaporizes while you inhale from the other end.
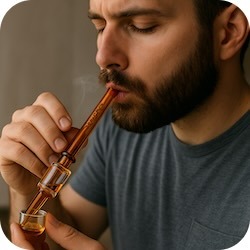
Dab straws, also called nectar collectors, offer a more portable and convenient way of dabbing. With their compact size and minimal components to function properly. You heard that right. No fussing with a quartz banger, carb cap, dab rig, terp pearls, none of it.
Besides their convenience and portability, dab straws provide the easiest way to dose your dab. Well get into this a little more later on.
What is a Dab Straw?
As previously mentioned, a dab straw quite literally looks like a straw that it used for dabbing. Now the term “dab straw” can be used to describe many different styles of tube-like dabbing devices. This is sort of a general name for these types of tools.
![]()
People use the word dab straw and nectar collector interchangeably, but nectar collector was originally a branded name for a dab straw. Long story short, the name caught on and it became a moniker for dab straws. We like to consider dab straws as those all in one types, while nectar collectors come with a detachable nail.
These simple contraptions are super easy to use, you heat the tip on one end, which would be your dab nail or dabbing tip if you are using an all in one. Touch the heated tip to your concentrate, and inhale through the opposite end which serves as your mouthpiece. And voila!
Types of Dab Straws
![]()
Dab straws can be made out of quartz, glass, silicone, they can be electric (meaning battery powered or enail powered) or heated by a torch. Whichever way you want to spin it, there's a dab straw out there just right for you!
Glass Dab Straws:
Glass is the most common material used to make these tools. Glass is durable to an extent, lightweight, easy to clean and maintains your dab flavors.
Silicone Dab Straws:
Silicone is obviously much more durable than glass dab straws. This material can be thrown around without a worry of breakage, perfect for traveling, outdoor activities, or just a clumsy dabber.
Electric Dab Straws (Electric Nectar Collector):
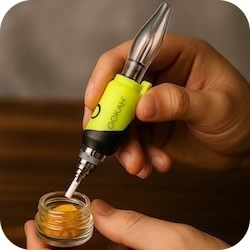
Electric in this instance just means battery powered, bringing you touch dabbing convenience without a torch. These devices rely on a battery to heat the tip, which makes it almost too good to be true since all you need is one device and a jar full of concentrate to get your dabs going. Hate to burst your bubble, but electric nectar collectors tend to be smaller in size, meant to fit in your pocket. Therefore the battery is usually on the smaller side requiring a recharge frequently.
Nectar Collector Dab Straw Dab Nail Tips:
If your dab straw isn't an all in one and has a removable tip, you may come across different dab nail/tip options and be curious as to what the differences are. Well here is a short and sweet breakdown of each.
Titanium Nail:
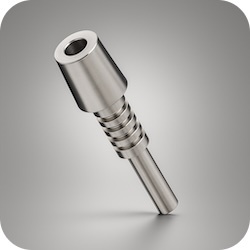
Titanium tips are the most common type of nail used with dab straws. These dab nails heat up to high temps rather quickly and maintain heat for long periods of time. Remember this tip is exposed to your surrounding temps, you need this thing to be HOT in order to vaporize your concentrate. Without the use of a carb cap heat can be sometimes harder to contain. This is where titanium sure comes in handy. Lower quality, unseasoned, or oxidized titanium nails can sometimes give off a metallicky taste when dabbing and depending on your torching skills, you might heat your nail too hot and burn through your dabs. If you're big on flavor it might be best to steer clear of these.
Quartz Tips:
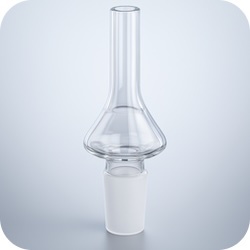
Ah, quartz, known for its excellent flavor, this type of dab nail is less common than titanium but if you're lucky enough to find one to fit your dab straw it is an absolutegame changer. Quartz does not retain heat for nearly as long as titanium but the flavor profile of your dabs will be spot on. It's a trade off that's worth it to the right people. Keep in mind, quartz is VERY different from glass, this material can withstand high temperatures without cracking while glass is very prone to cracking under intense heat.
Ceramic Dab Nail:
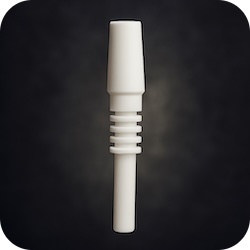
Ceramic is more of an old school material that made its way to the top for its incredible flavor before quartz did. Ceramic is known for its low and slow heating and its flavor, partly due to its gradual rise in temperature. This type of material retains heat well but it takes a long while to heat up to temperature. It's also pretty porous (meaning the surface is made up of millions of tiny little holes) which might be more of a headache to clean leading to more frequent replacements. Once your concentrate seeps into the holes, it stays there and hardens, then you're just stuck with “blegh” tasting dabs until you replace it. Now there's a huge difference between coated ceramic and non coated, you'll notice the appearance, one is more matte (not coated) while the other has a shiny layer to it. Coated is obviously way easier to clean and maintain over time.
Glass - All in One Dab Straws:
If you have an all in one dab straw chances are the tip is made of glass like the rest of its body is. Be mindful of your torch! As I mentioned before, glass WILL crack under intense heat, so make sure you are heating your tip enough to vaporize your dab but you're not over heating to the point where the tip cracks! Beware of glowing glass, once the tip is glowing red you know that you've gone too far. Keeping your torch flame focused on one spot will also open you up to cracking or shattering issues. The goal is to heat evenly and slowly, these types of dab straws are great for light to medium usage.
Things You Need To Use A Dab Straw
First things first, you'd want to assess what type of setup you have. If you have an all in one dab straw, well then that's all you need in addition to a torch and your concentrate. If you have a “nectar collector” or a dab straw with a removable nail, this setup requires a few extra steps.
All in One Glass Dab Straw:
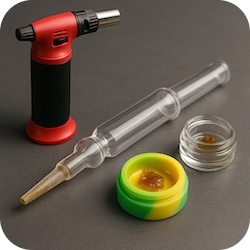
If you have an electric nectar collector, the list below is the same minus the torch, since your device is battery powered.
- Your Dab Straw
- Dab Torch
- Silicone Jar/Glass Jar/Silicone Mat
- This step completely depends on you and your preference. Some people prefer silicone to store their concentrates while some people prefer glass because they feel like the silicone affects the flavor.
A “nectar collector” setup, that comes with a removable nail, should come with most of these pieces included. If you are having trouble figuring out what goes where feel free to contact our live chat for some guidance!
Nectar Collector:
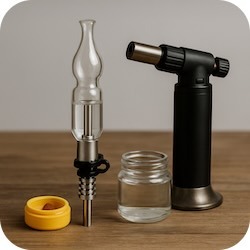
- Nectar Collector Top (Usually a Water Bubbler)
- Water - to fill the water bubbler
- Dab Nail Tip
- Keck Clip - to secure the dab nail to bubbler
- Torch - or Enail (Not all nectar collectors work with enails, you need a specific tip to hold an enail coil)
- Silicone Jar/Glass Jar/Silicone Mat
Bonus: Cleaning Kit: It's best to keep a cleaning kit on hand especially when you're consuming something as sticky and messy as concentrates. Luckily, we have a variety of cleaning kits available! The nectar collector cleaning kits come with bristle brushes to clean out the airpath and dab tip which can easily accumulate build up and harden. This will cause your inhales to feel labored or your device to clog. Cleaning out the airpath and tip with a cleaning brush and some iso alcohol will keep your dab straw working in tip top shape!
How To Use A Dab Straw (Step by Step Guide)
Start By Prepping Your Dabs
- Open up your jar if your concentrate is already stored in a jar, if you prefer using a silicone mat place your concentrate on your mat before you begin.
Heat Your Dab Tip
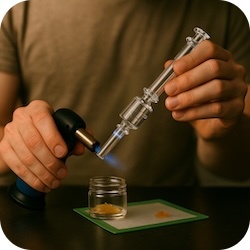
Now this step varies depending on whether your dab straw is electric or attached to an enail. If not, obviously you are using a torch to heat.
- With a torch heat the tip evenly gently moving your dab straw tip around. Try not to focus on just one area, your tip should reach a slight glow then let it cool for about 7-10 seconds and proceed to dab.
- Most electric nectar collectors come with three preset temperature settings and a pre heat or sesh mode - check your user manual if you're unfamiliar with your device and how to change its settings. Usually it's just a series of button clicks.
- For an enail, you would just set your temperature to your desired degree, wait a minute or two after your controller reaches temperature to start dabbing.
Lightly Touch The Dab Tip to Your Concentrate
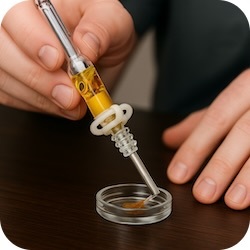
- This step might have a bit of a learning curve, but once you get the hang of it you'll be off to the races! When we say lightly, we mean LIGHTLY. You would want to gently edge the side of your dab nail/tip to the very edges of your wax. The heated tip will vaporize while the hollow opening of your nail pulls in the dab vapor as you inhale.
- You would want to keep your nectar collector at a 45 degree angle while it's vaporizing your wax. The opening at the bottom of your dab nail needs to be left open so that it can draw in your vapor. Your dab nails outer walls should be making contact, not the center. Holding your nectar collector straight up into your dab jar is a strict no-no, keeping a slight angle is best!
Rotate, Drag, or Touch and Pull Away

This is where the magic of a nectar collector really shines, you can control your dab size without the use of a dab tool, sticky fingers, hot knives, or whatever else you can think of to piece out your dabs. I know some of you have questionable methods.
As your dab is vaporizing from its first contact with the nail, you can either:
- Pull your nail away if you got a sufficient cloud.
- Or you can continue to slowly drag your nail along the edge of your wax until you feel your dab is to your liking.
Dab dosing might be a little tricky to some, but dab straws leave the power in your hands, literally. It's your world, we are just living in it.
Bonus: You can slightly turn your nectar collector / dab straw as it makes contact with your dabs. This will allow more of the heated dab nail surface to vaporize your wax. Remember, as soon as your nail touches your concentrate the temperature of your nail instantly changes, it's not as hot as it was prior to meeting a substance that is a different temperature. Think of hot metal falling into water, the metal will make the water boil but rather quickly the metal cools down to the temperature of the water. It's the same concept when it comes to dabbing!
Avoid diving your tip directly into the center of your wax jar. As I said above, the temperature of your tip will change as it makes contact with your wax, it will cool down. If your dab nail is cooling to a regular temperature, and you're still inhaling, while the tip is not vaporizing as quickly as it should, it will cause your wax to be drawn into the hollow opening of your nail.
This is the opposite of what we want to happen. You're looking for vaporization, you don't want to drink your concentrates.
Inhalation rate is also an important factor to using a dab straw successfully. You would want to inhale slowly and gently. Pulling too hard from the mouthpiece might also cause your wax to be drawn in from the tip.
Cleaning
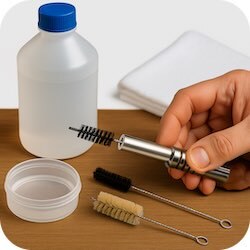
- AHA! Everyone's favorite part. You SHOULD clean your tip immediately after you’re done with your session or if you run into a mess where your wax got drawn into the tip. I know we all skip it from time to time, I'm not judging, I promise. If you're a bit of a lazy dabber, invest in an iso jar and some cleaning swabs. Dip a swab into iso alcohol and run it through the dab nail/tip opening.This will help maintain flavor while reducing the chance of clogging. - not applicable to electric nectar collectors
Best Temperature for Dab Straws
This is the question of the year! Dabbing temperature really just depends on preference. You'd want to start around 500 degrees and work your way up or down based on what you like better. Lower temp dabs start at around 450 to 500. Mid temp is 500-550, high temp is 550-600. Five hundred is a good middle point to get you started if you're a newbie and just getting into dabbing!
If you'd like to read more in depth about dabbing temperature click here!
Pros and Cons to Dab Straws
Dab straws are pretty reliable, easy to use, beginner friendly, and overall they're affordable. They have less moving parts than a full rig setup, it's an all in one sort of device that makes it quick and simple to dab with.
On the other hand, dab straws are more prone to clogging than a rig since the airpath is usually a lot more narrow and it's a straight path that's direct to inhale from. Torch dabbing in any form whether it's with a rig or a nectar collector can sometimes burn your dab instead of vaporizing it depending on your nails temperature. This part might be tricky especially for beginners.
All in all, we believe that having a dab straw in your collection always proves to be useful particularly when you're on the go, are keen to micro-dose throughout the day, or worse comes to worst if your rig breaks!
Recent Posts
-
Terpenes Explained: A Complete Guide for Dabbing & Flavor
Terpenes are an important part of the equation when it comes to the type of high you'll experience. …13th Feb 2026 -
What is the Difference Between Indica and Sativa? Terpenes
Why does the Distinction Between Indica and Sativa Even Matter? Indica plants have a different appea …4th Feb 2026 -
When Is THC Potency Considered High? Why THC % Matters
THC Potency is usually listed on a product label or on the product packaging itself, especially if i …7th Jan 2026
